The purpose of a graduated neutral density filter (also referred to as a grad, split neutral density filter, or GND) is to control the dynamic range of an image so the photographer can capture the full range of light; ideally within a single exposure or two if necessary. Typically these filters are made of rectangular glass or resin, with the top half neutral and the bottom half being clear. These filters come in varying degrees of sizes and typically they control anywhere between 1 and 3 stops of light.
Due to the onset of digital technology and the rapid increase in popularity of landscape photography, many photographers have questions as the practicality and usage of these filters. The idea of this tutorial is to provide some useful tips and answer some of these questions, so that you the reader can take this knowledge into the field and apply it to capturing better images. This is part one of a series, so let’s get started!
Why use a GND in the first place, why not just bracket and exposure blend? This is an interesting topic of conversation these days in the landscape photography world. A lot comes down to personal preference. I prefer grads for several reasons. First off, I enjoy getting the exposure right at the time of capture, which usually saves a lot of time and headache later on while processing. Additionally, if using a digital camera, you can see the image right then and there on your LCD without having to flip back and forth between shots. For me, exposure blending comes with one major risk, if there is even the slightest bit of camera movement in between shots, successfully aligning the pictures during post processing becomes a risky proposition at best. I’d rather not take the chance if given a choice. Second, GND’s allow me to capture a greater amount of detail in clouds that I simply cannot seem to replicate by bracketing and blending alone. I am not sure why this is, but it is my personal experience. Take a look at the detail, light, and texture in the clouds in this shot below.
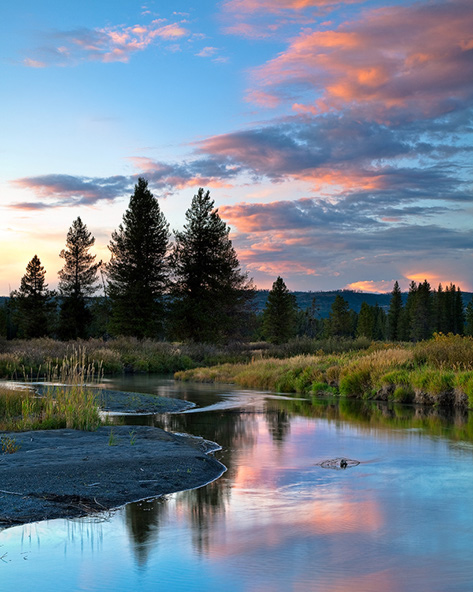
Boundary Creek, Yellowstone National Park
How do you attach a GND to your camera? There are two primary ways and we’ll discuss the pros and cons of each. First off, the proper way is to use a holder that screws onto the lens of your camera and allows you to slip the normally rectangular shaped filter in it. (I currently use a Cokin Z Pro Holder) There are several advantages to this method. The primary one is consistency. It is far easier to fine tune the filter placement because you can take multiple shots and then go back and make micro adjustments to the filter, without it moving in the interim. Essentially, this gives you greater control of the image. Another advantage is that you don’t have to concern yourself with camera shake or inappropriately moving the filter during exposure. You attach the filter, step away from the lens, and take your shot using a remote control or timer.
The second way to use the filter is to handhold it on or slightly in front of your camera. The best reason to do this is that it initially saves you a lot of time. If you are dealing with rapidly changing light conditions and you need to get set up and shoot in a hurry this may be your best option. You don’t have to worry about screwing on and attaching the filter holder, which can take several minutes to accomplish, at least for me it does! Also, if you are using a super wide angle or fish eye lens – you are most likely going to get vignetting using most GND filter holders. In this case, if you don’t want to change your focal length and want to use a grad, you will probably want to hand hold it.
The way I handhold is to place the filter square on the end of the lens, then make sure my hand isn’t in the shot, try not to move at all, and then take the picture. For me, a 10 second exposure is about the maximum time I can successfully hold still the filter without moving it. Other people do it differently. I’ve talked to some who actually hold the filter slightly in front of the lens and others who move the filter around during exposure. I haven’t found success with either of these techniques. One more caution about handholding GND’s. Make sure you double and triple check the clarity of the image to other images where you haven’t been using the technique. Even handholding for just ½ a second can cause enough movement to compromise the clarity of your shot.
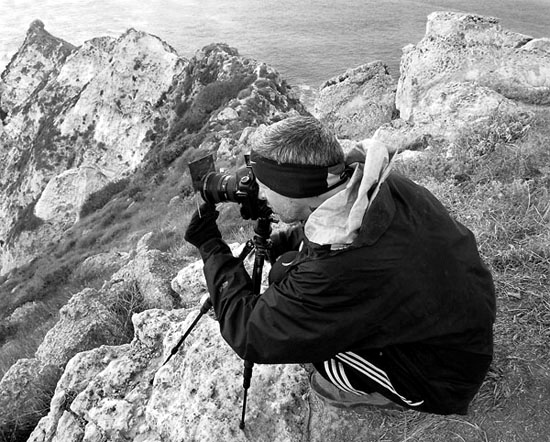
Handholding a GND, Channel Islands National Park, CA
Which types of GND's are the best to use? Most photographers prefer soft edged grads, which soften the transition line in the image. I personally like to use hard edged filters more, although it is important to own both types. Why? Certain types of light and landscape horizons demand different types of filters. Overall, I like hard edged filters because it gives me more control and consistency in creating my images. Remember, you don’t have to use the grad just in the sky, any kind of consistent line or surface works fine. It is important to be creative and experiment when possible.
In summary, graduated neutral density filters are indispensible tool in my aerosol of photography equipment. The detail, control, and gratification in creating my images are the main reasons I will continue to use them wherever I go to capture and bring landscape scenery to life. Below, I’ve included a small list of tips and summary pointers from this article and I hope that you find this article useful. Please feel free to contact me with any further questions you might have.
Useful Tips
1. A light pair of gloves can help you successfully handhold filters and generally makes them easier to grip
2. Always watch for fingerprints and smudges on your filters and clean regularly
3. The larger 4 x 6 filters work better
4. Try stacking filters for more eye popping results
5. Make sure you carry both hard and soft edged filters
6. Look for horizontal and diagonal lines and planes in the image for filter placement
7. Make sure you have back-up filters in case you break one in the field on an extended trip
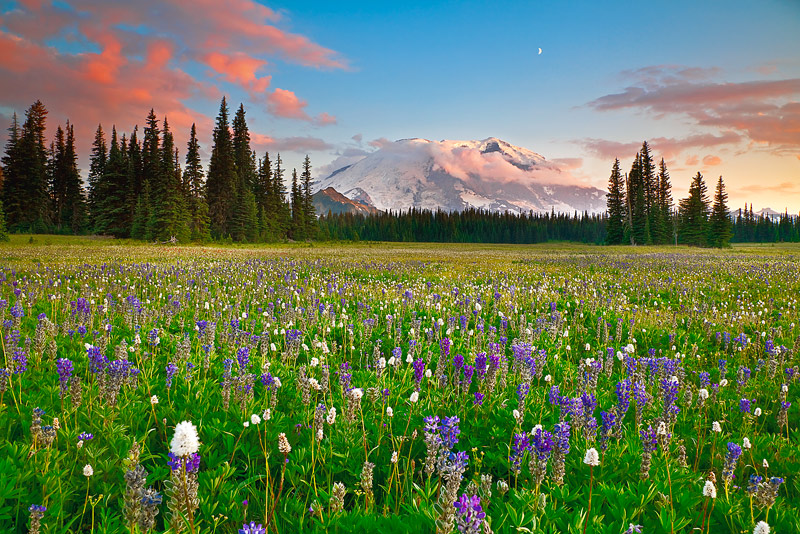
Double stacking grads helped me capture this epic image of Mount Rainier at sunset
One filter was placed across the base of the trees and another was doubly used in the sky allowing me to properly capture the luminance and details in the moon