Whether you are a new or experienced photographer, sharpening your images for the web is a critical process in your workflow and is also one of the hardest steps to master. There are many techniques to this approach and today I am sharing with you the one that works best for me. Currently I employ at two part approach to web sharpening, which I believe gives me more control and offers better results. This tutorial is designed to walk you through the steps I use when sharpening my landscape photographs for the web. We’ll go each step in detail, although the function of every step will not be fully explained. Please make sure that all your work is saved and all your adjustment layers are flattened before beginning these steps. This is an intermediate level tutorial.
Step One - File > Automate > Fit Image
There are two main keys to this phase:
1) You want to type the same size in both the width and height boxes
2) The number you select should be double the final size of your intended picture on the long side.

Step Two – Create a Duplicate Layer – Press Ctrl + J
1) Name duplicate layer “smart sharpen”
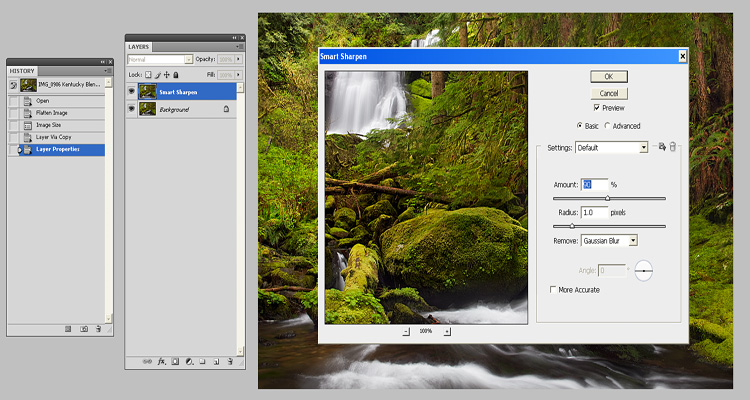
Step Three – Filter > Sharpen > Smart Sharpen
1) Start with the settings: 90% Amount, Radius 1, Remove Gaussian Blur
Zoom into 100% - image should look slightly over sharpened at this level
Tweak settings to your preferences based on subject matter
Step Four – File > Automate > Fit Image
1) Resize image to your intended final size on the long side in both the width and height boxes
Step Five – Create Duplicate Layer - Press Ctrl + J
1) Make sure you copy your original layer and not the smart sharpen layer
2) Name duplicate layer “high pass sharpen”
Step Six – Filter > Other > High Pass
1) Set Radius to .6
2) Change layer type from normal to hard light
3) Set opacity to 30%
4) Make sure “High Pass” layer is the top layer in your layers palette


At this point, you are almost finished! You now have two layers of finely tuned sharpening on your image. You can adjust the opacity on either layer to control its strength and you can also mask off parts of the image to exclude or reduce the sharpening effects from that area.
Please note this sharpening method can slightly reduce the color and contrast of your image. To offset this, I recommend a simple saturation and vibrance adjustment of four to seven points. Another option to consider is a simple contrast adjustment of 10 to 15 points depending on the image.
At this point, I recommend using the 'save for web' feature in photoshop and your image is ready to go!